Creating Models For Quake 1
Posted on 2016-02-28 in projects
Update 2024: I fixed some of the broken and outdated links. Removed some steps which no longer work, Added some information which I felt was beneficial
Preface
This is kind of a tutorial/gathering of infomation about creating a model (specifically enemy model) for quake 1. I recently went through the whole process and want to share some of the stuff I've learned.
I'm a hobbyist and learned most of this as I went along. Aside from the part about texture-painting (which I have done in before) this is more a collection of links than a tutorial.
Index
Software
- Blender - for 3d modeling
- Quake MDL import/export plugin for Blender - for exporting to mdl format
- Krita - for digital painting
- Fteqcc - for compiling quakec
- QuakeC v1.06 Base - as a codebase for quakec
- Slade3 - for exploring quake1 pak files
- Trenchbroom - for editing quake levels
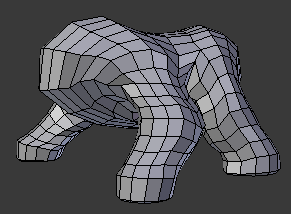
Creating The Model
I saw this video Protoss Leg Modeling Method some time ago. Although it is not much I really liked it because it shows a flowchart way of modeling shapes that have a cylindrical nature. It's something I understood and was confident that I could replicate. It is how I did the legs of the model.
Doing this in Blender seemed cumbersome at first because the box selection tool uses a keyboard shortcut B instead of just beeing the right mouse default function. But I then discovered that A is De/select-All and this becomes super fast by alternating A,B.
There is alot to learn about blender and I haven't really scratched the surface but blender.stackexchange.com is the ultimate resource of awesome and SPACE opens a textfield that lets you search for anything in blender.
Aside from that I would urge you to visit the Youtube Channel of Darrin Lile because thats where I learned what I wanted in an enjoyable and easy to grasp manner.
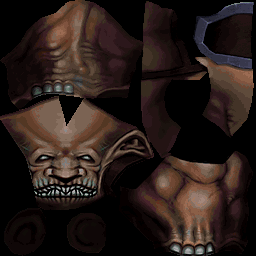
Creating The UV Map
In order to paint the texture the model needs to be unwrapped. Which means the models needs information about how a 2d image would be applied to the 3d polygons to be its texture. A result of this looks something like this.
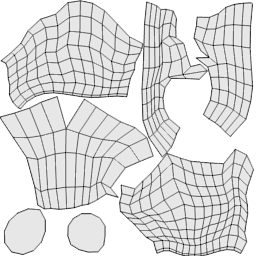
Again by Darrin Lile: Blender Character UV Mapping you can pretty much follow this tutorial exactly.
Seams, Stretching and Shapes
The tutorial talks a bit about stretching and seam placement. One thing I would add to that would be to keep in mind that you want to paint the texture later. When you use blenders 3d painting tools this is less of a problem. But in an imageeditor some seams are very hard to fix. Try to make seams straight lines where possible because that is easily to hide by copying/mirroring. Also try to maintain recognizable shapes. When painting one tends to stick to how he/she would do it in a drawing. Stretches and forms that only look good on the model but are weird on the texturemap are hard to paint. Usually the painted texturemap should look cool by itself.
Applying The Image Texture
Blender has different renderers and applying texture has something to do with materials which are defined differently for these renderers. I didn't care to learn much about this. Just know that the MDL exporter expects the texture to be at a specific place when exporting. To achieve this try to drag'n'drop your image file from you file explorer onto the object in blender. I don't know what magic happens there but it just worked and I didn't want to think about it more than this.
Painting The Texture
This step essentially comes down to plain digital painting where you handpaint everything starting from a blank screen. There is no single tutorial for this because the topic is vast and people spend lifetimes on it. If you've never done anything in this area your texture will probably come out sub par at first but I do want to encourage you. I personally was very invested into pursuing 2d art at one point in my life but stopped because I realized I wasn't quite willing to put in the necessary work to get gud.
However painting textures for a 3d model is less hard. Proportions and perspective is taken care of by the 3d model and you won't have to worry about that. Gamemodels are usually moving so you can get away with textures that don't ooze perfection in still. Also, especially old tech like quake can be very forgiving because of the low resolutions. If you for example have trouble painting ears that won't be more than a couple of pixels in the end so don't sweat it. What I'm saying is that it's possible to make at least decent 2d gameart without being a dedicated 2d artist.
Tablet
A graphic tablet is a necessity in my opinion. Maybe not if you primarily do very technical stuff like machines, mechs, weapons or if you are a superb pixel artists but when it comes to organic forms I wouldn't want to use a mouse.
Wacom makes great products. I have a Graphire4 which is old but does the job. I wish I had more pressure levels and more DPI but it's not a big problem. Basically if you're starting out get any wacom tablet that suits your price doesn't matter which. If you wan't to have something better get an Intuos Pro or Cintiq.
Brushes
Photoshop is great but expensive. Gimp is great but also not. I recently tried Krita which I like. Doesn't matter which software - I always try to assemble this basic set of tools.
Paintbrush
A tool to lay down paint. I use only one because I'm not very experienced and don't know how to handle the many presets there are. I know how to use a real pencil and thats why I fiddle with the brush settings until I can comfortably create this gradienty kind of thing in one stroke.

Here are a couple of tips to get this
- The brushtip is 100% hard.
- Play with the density/spacing. Try 100%.
- Pressuresensitivity is on for size and opacity
- If you're not super precise with the pressure. Try limiting the size range maybe only 100%-80%.
- If you're not super precise with the pressure. Play with the pressure curve for opacity. Make it so that 100% opacity only comes when you press real hard.
- If opacity builds up during one stroke when you pass a section twice. Try to deactivate that. Search for "build up" or "wash" mode.
Smudger
Literally satan. Having hard edges is a thing that makes stuff look crisp. It's why I use a hard brush to paint. Blurry brushstrokes is one of the most common things that makes beginner artwork look bad. Still I use this tool. Most of the time when evening out too harsh highlights like this.
This brush is 2-4px wide and at 20-40% strength.
Softie
A big round brush with soft edges and very low opacity. I use this to create soft gradients or to apply color lighly without disrupting anything. Usually in a situation where I have a selection and then use the side of the brush like this.
Workflow and Tips
I attack the empty texture with this basic arsenal until I'm happy with what I see. At this point I feel like a crazy person running in circles hoping for something good to happen. All the brushstrokes are bad. Colors look off or boring but I know it gets better when I invest more time so I keep at it. I can't say much about this but other people can. Check out youtube for people who post about general digital art like Sycra. I'm sure you can find many more.
Basic Shading Progression
I made a timelapse video of my texturing workflow for another model.
2d-3d Back And Forth
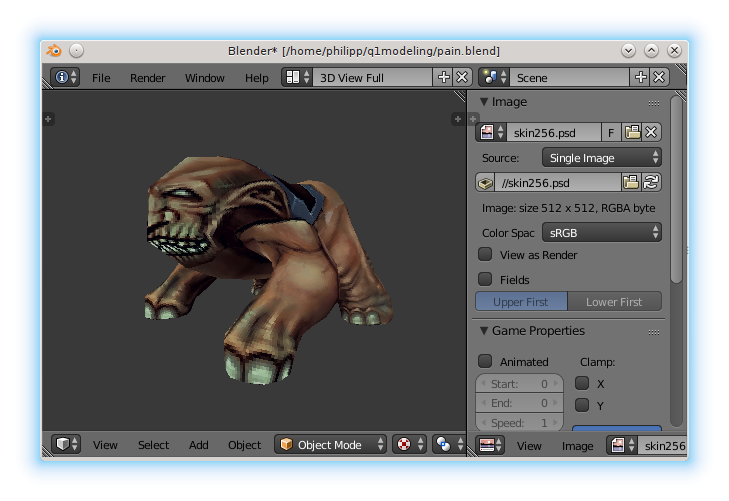
I paint exclusively in the 2d software but I need to constantly check the 3d model if everything is right. To do this comfortably I have blender on the 2nd monitor (or in the background). I use "3D View Full" as the screenlayout to get rid of the grid and stuff. In the view options N I activate Display -> Shadeless because I don't want blenders ugly shading but fullbright instead. I split the window and also open a UV-Image-Editor view and activiate the options side-bar N. Under image there is the texture file and you can press the refresh button next to it to reload the texture. Blender can read PSD files and krita and gimp can also work with them. PSD files preserve layers and thats how this all becomes comfortable. Paint a little, save, press refresh in blender, repeat.
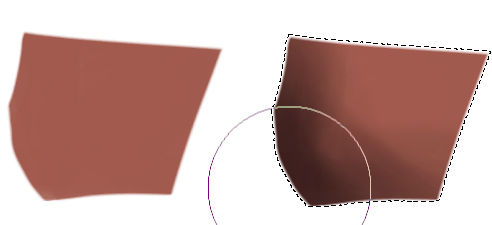
Double Resolution
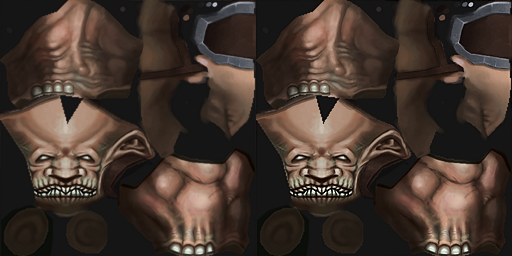
My brushstrokes are wonky and I don't know how to do close-up pixel pushing. What I do to help with that is paint the texture in twice the resolution. If the target texture is 256x256px I paint in 512x512px. The downscaling in the end smooths out some of the irregularities. Lazily done gradients become smooth and some mistakes disappear. However the whole image becomes blurry and looses contrast too. To help with that there is a filter called "Unsharp Mask" (look under sharpen or enhance). Use with low values. The image below shows how to get some of the crispness back with this filter.
Blending Modes
Learn about blending modes regarding brushes and layers. There are cool light effects like rimlights, neon glow, fire and subsurface scattering and all those flashy things. They look great on textures. Blending modes help with this. You should become familiar with multiply, screen/lighten, dodge, burn and overlay. Check out this video: Painting with Blending-modes .
Use More Colors
A quick thing on colors. If you experience the problem that your skintones look dull or off. Check out this video: How to Paint Realistic Skin Tones.
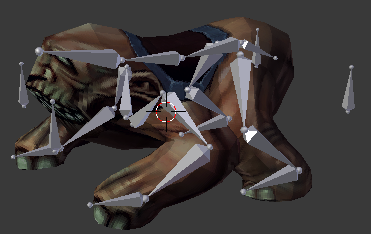
Rigging
Rigging means preparing the model in a way that makes it easy to pose the model. Usually by applying some kind of virtual bone structure where you can move hands or feet in 3d space and the other joints move in some realistic manner too which saves you time.
The keyword here is inverse kinematics and I can only point you to videos by Darrin Lile again. Blender Character Rigging and following explain the manual process defining bones and their properties and it's the method I used.
A way easier approach for is using Blenders riggify addon. See Rigify Made Easy. Which makes it easy because there a predefined skeletons you can use by just aligning the joints with your model and pressing "Generate Rig".
Animation
Now this again is a topic that dabbles in the domain of art. Animation is hard and demands a feel for poses, motion and movement. Even if you are good at this things might not look they way you intend. This is especially true for walk and run animations because it's a thing we as humans see a lot and can see every minute problem in. See uncanny valley for more information about this.
I used keyframe animation which is a technique where you define the distinct poses that appear in the animation you want to make and the software (blender) does the job of interpolating the in-between states that appear.
Some tips
- Identify extreme poses in your animation, pose them and set full character keyframes at those points. Then define the inbetween stages afterwards. Just going from left to right sometimes causes headaches and this bisecting approach usually works better.
- Make animations loopable. There are two ideas here. Either you loop into the first frame of your animation so that the animations itself loop well. You can do this like this: When you are almost done with one animation copy the pose of the first frame of the current animation and paste it somewhere after your last keyframe. Then go back and find a good "almost there" pose and copy this as your actual last frame of the animation. This way you are blending into the loop. Another approach is to blend into your characters primary animation which usually is the run cycle. Do the same as before just use the first frame of your run cycle as the base.
- Better yet. Get to know the helpful quality of life features blender has around animation. If you are unfamiliar with this just know that there are serious shortcuts to be found everywhere. See Character animation for impatient people - Blender Tutorial
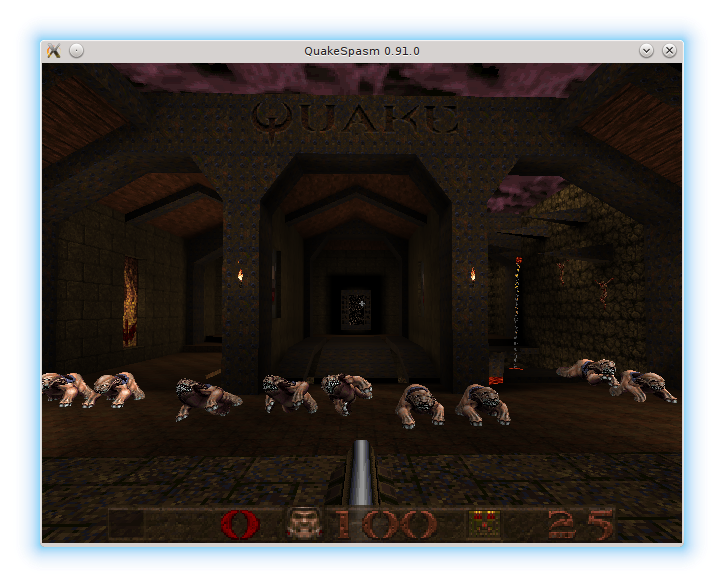
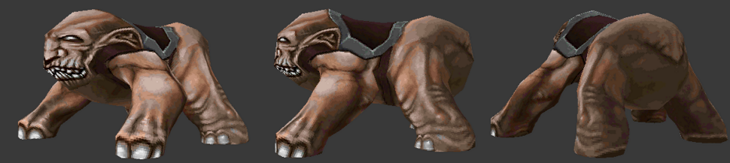
I made an in-game youtube video of my final model. At around 00:46 you can see all the animations that the model uses.
This is a part I will have to learn alot about too. For the technicalities I can again refer you to Blender Character Animation other than that you'll have to trial-and-error yourself through this. Which is what I did too.
Some things to note
- Quake animates at 10fps, set blender to this playback speed to see how it shows up in quake
- The different animations (like jump, die, shoot) will be one after the other in the timeline. If you have auto-keyframing (red record button) activated you can press A to select every bone and then ALT+R and ALT+G to reset the pose while also thouching every bone whichs creates a keyframe for each bone. This eliminates weird interpolation issues and is something I did for the first frame of each animation. Another more explicit way to do this is by using the menu Pose -> Animation -> Insert Keyframe -> Whole Character
- Use existing quake models for reference about how many frames an animation should take and how the poses are spaced. I used the dog/rottweiler for reference.
- The whole animation part goes hand in hand with the quakec and your idea of the behaviour of the model. You probably should do the coding and animating simultaneously if you are working on a brand new model.
Exporting To MDL
This step is pretty easy because the MDL exporter does everthing for you. Note that animation is exported from frame 1 to the frame you have currently selected.
Check this video MDL for Blender 2.8 - Common Problems, Quirks and Solutions to get some more detailed information.
The Quake Palette
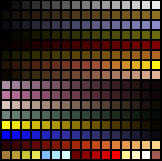
https://quakewiki.org/wiki/Quake_palette
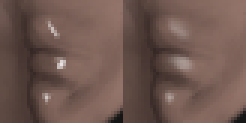
Quake 1 textures have only 256 colors. Luckily this is something the mdl exporter does take care of too. It finds the closest color match for each pixel of your texture and converts the image this way. However there is one thing to be wary of. The last 32 color in this palette are fullbright colors. In-game quake does manipulate your texture color according to the current light value. But not the last 32 colors. These colors are there for various lights or fire that stay fully lit no matter where they are. An inconvenient sideeffect of this is that the mdl exporter might interpret some of your texture's colors as these fullbright colors and you'll get some weirdly lit pixels in your texture.
This is how the texture looks after the palette conversion. You can see some artifacts in the gradients which makes it look like its 1996.
Palette conversion and Dithering
As you can see there are some nasty jumps in the gradient there. To avoid this and also the issue with the fullbright colors you can take care of the color conversion manually. For this you can use Krita using the Map -> Palettelize filter. There you have a bunch of options to make it look good. You can also use a dedicated tool like SLK-img2pixel.
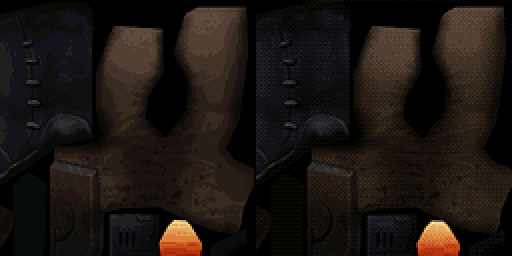
In the example above you can see the result of the exporter on the left and on the right I used SLK-img2pixel. You can see the it all looks much nicer. If you zoom in you can also see the familiar dithering patterns from ancient times.
To avoid the fullbright issue you just use a reduced palette for the conversion.
Scale, Location and Rotation
- The mdl exporter translates blender units to quake units 1:1. This means that quake models are giant behemoths in blender. Import an original quake model into your scene and scale your model so it looks good in comparison. Also you should keep the hit/hurt boxes of the enemies in mind. I don't know the specifics of it yet but I think it's the same box you see in a leveleditor when placing monsters. They are usually power of 2 boxes like 32x32 and I think you can also influence this in quakec. With my model I just sticked with the original dog/rottweiler monster and scaled my model so it fits that box.
- The floor in quake is at -24 units. Create a plane at -24 and move your model so it nicely stands on this plane.
- If you import an original mdl into blender you'll see it facing in an other direction by 90°. You should do this to your model too but maybe only after animating if you want to use the X-Mirror tool while animating.
- Lastly. Scale, location and rotation shouldn't be properties of the object. The object should have a scale of 1, rotation of 0° and location of 0 on all axis. If thats not the case press CTRL+A->Location and CTRL+A->Rotation&Scale to transfer these values to the mesh.
Directory Structure
Since the new model will have model, sound and code it essentially becomes a quake mod. Mods get their own directory in your quake installation and you will have to start quake with -game <yourdirectory> commandline arguments. Check out other quake mods for directory and naming conventions. The mdl file usually goes in the progs directory.
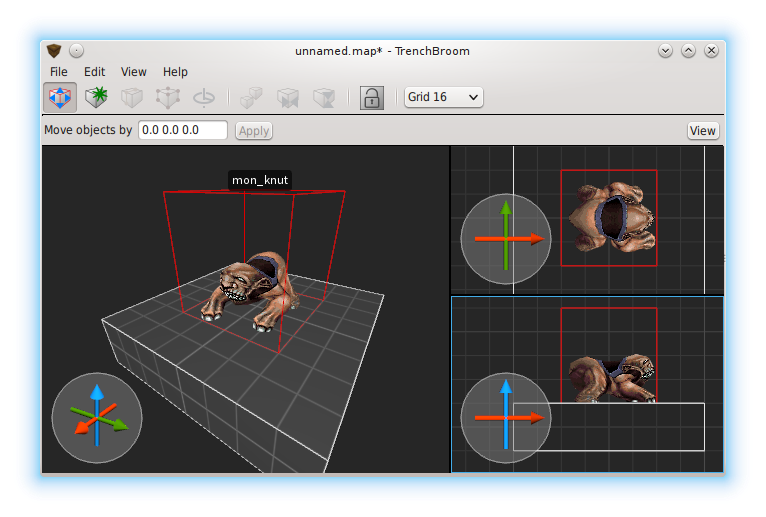
Level Editor
I use trenchbroom as the quake level editor. To use a new model in there you will need an entity definiton. Trenchbroom reads .fgd and .def files and comes with a standard quake entity definition .fgd file in its resource directory. Copy that and add your own entity defintion to this. It will look something like this.
@PointClass base(Monster) size(-32 -32 -24, 32 32 40) model(":progs/mon_knut.mdl") = mon_knut : "Nasty Manbearpig" []
Size defines the bounding box. Model defines the model that is shown in the editor. The string after the = defines the entity spawn function that will be called when quake loads the map.
To add your .fgd file in trenchbroom got to the inspector on the right. At the bottom of the entity tab you can use external .fgd files. At the bottom of the map tab you can activate mods directories to be read.
QuakeC
Having experience in programming will help but if you made it here you probably don't care and are willing to learn whatever is necessary. Which is good because programming is fun.
Setup
You will need the code base and also the compiler (fteqcc). Create a directory in you mod directory and name it qc or whatever. Extract the code base there. For simplicity's sake also copy the compiler there. (I've put the compiler binary in my PATH environment variable and call it using qcc anywhere). When you run the compiler it looks for a file named progs.src in the current directory. It then compiles every quakec file listed there in order and creates the resultfile PROGS.DAT in the parent directory (which should be the root directory of your mod). When you start quake with the -game <yourdirectory> parameter quake will read your PROGS.DAT instead of the vanilla quake one and all gameplay behaves the way you defined in the quakec files. This is where the fun starts.
Coding
Read this Tutorial by Preach (specifically Day6 and 7). If you use GMAX instead of blender the whole tutorial would be the one to read in the first place. However he explains how the animation data from the model is linked to the behaviour in quakec.
Blender animation frame 0 gets discarded on mdl export and your animations should start at 1. Quake counts starting from 0 but that shouldn't concern you since you should use the $frame directive mentioned in the preach's tutorial. You only need to know how many frames each of your animations last. Give each of your animation frames a name with this $frame directive and then refer to these in the think functions.
Of course defining animations isn't the end of it. For the whole behaviour part I'd suggest you to scour about in the files of the quakec base. The definitions for each original monster is in there ranging from melee attacks, to projectiles, grenades, movement and more. Use what you can find.
I hope you did get good infomation out of this tutorial and I wish you good look realizing your project.